Before even thinking about how to roof a house, you need to ask yourself the question, why roof a house yourself. Roofing is seriously hard work and carries with it the risk of death and serious injury not to mention the onslaught of Mother Nature whether that be howling winds, driving rains or sweltering heat. You will also need to comply with Building Regulations to ensure you are using materials with the right thermal insulation and fire retardant properties.
Image Copyright: jpchret / 123RF Stock Photo
NB: This guide covering how to roof a house only covers pitched roofs using shingles. Other guides will be published soon. If your house is very tall or your roof very steep the best advice is forget it – get a professional roofing firm in.
If your roof is not that far from the ground and relatively shallow, we recommend reading the safety advice below (see Part 1) and then following this three step test:
Step 1. The Height Test
Obviously, if you are considering roofing your own house you should be comfortable with heights. That means not just clambering up a ladder but moving around on a roof without your knees knocking together or your stomach in your throat. Check the safety advice below (in particular securing the roof, checking/setting your ladders and buying a fall protection kit) and then make a few exploratory forays on your roof. If you are still confident that the height isn’t going to deter you, move on to the second step:
Step 2. The Strength Test
Visit your friendly local roofing supply outlet and practice carrying things such as rolls of felt paper and shingles. Don’t carry loads more than 20kg in weight and please read the manual handling advice from the CITB before performing the Strength Test.
Disclaimer: We can not be responsible for any injuries caused by following this guidance without informing yourself on correct manual handling techniques.
Step 3. The Height and Fitness Test
If you pass this next step you might do well to consider a career in the roofing trade!
Re-read the manual handling advice in Step 2 and the safety advice in Part One (below) and then practise safely carrying some roofing materials up and down your ladders and along your roof.
Still want to roof a house? Then follow the guidance below.
Please note that this is not the only way to roof a house or even necessarily the best way to roof a house!
How to Roof a House Part One: Safety
For a comprehensive guide to safe roofing, see this brochure.
Your biggest ally when it comes to safety in roofing (and with any maintenance or DIY project) is to use good, old-fashioned common sense. If you feel like taking a risk, remind yourself of the potential consequences (death, paralysis, grief for your children and/or your significant other) and make the right decision.
- Pay attention to your footwear. You want as much traction as possible so opt for shoes with a soft rubber sole.
- Make sure your roof is as clean and free from dirt and debris as possible before beginning your roofing project.
- Ensure everyone in the vicinity is wearing hard hats in case tools are dropped; children and pets should be kept well away from the area.
- Set up a covered chute into a skip/waste bucket for rubbish. If this is not possible, at least make sure you look down and give a clear shout before dropping anything from the roof.
- Ensure there are no trailing cords or ropes on the roof at any time; these are dangerous tripping hazards.
- Set up scaffolding for installing the drip edge and first courses of tiles.
- Check the load capacity of your ladders. They should be able to support your weight plus an extra 80 pounds.
- Always extend your ladder three feet above the eaves and never
- stand on any rungs above the eaves.
How to Roof a House Part Two: Stripping
Once you’ve familiarised yourself with the safety instructions above and any other manual handling and health and safety guidance/legislation, it is time to strip the existing roof down to the decking. Pick a dry day to do this where possible. Some sources recommend working in sections whereas others advise to strip the whole roof first.
Using a roofing shovel (or a garden fork) remove the ridge caps and shingles, starting from the edge furthest from the skip and working down from peak to eaves in sections. Be careful of any rotted decking as you move about on the roof. (this will also need to be repaired before you move forwards of course).
The felt paper should come off pretty easily but you may find that some of the previous underlayment is so degraded that it won’t shift. In most cases it is fine to leave small pieces in situ but make sure that you remove or flatten any existing nails and staples.
How to Roof a House Part Three: The Drip Edge
The drip edge overhangs the fascia and prevents shingles from curling over the roof edge, causing water to soak in behind the fascia. This can lead to the fascia rotting, stains on the walls and, in extreme cases, erosion on the ground which can threaten foundations. A drip edge also prevents insects from entering between the fascia and decking and gives the roof a neat finish.
Install your drip edge along the eaves in sections, working up the roof, and nailing to the deck every couple of feet.
How to Roof a House Part Four: The Underlayment
Self-stick underlayment protects the decking from rain and ice and many premium brands also offer the shingles some protection from wood resins in the decking. Underlayment is designed to be breathable to allow moisture to escape. The sticky backing is split into two so that you can peel the top part off while leaving the bottom part covered.
Your underlayment should come with specific instructions but, if not, here is a general guide to laying:
First, line up your first roll with its bottom edge along the drip edge. Nail the top corner (furthest from the eaves) to the deck and unroll the underlayment, removing the top part of the backing as you go and making sure that it sticks down flat. If the pitch of your roof is steep, you may need to work in ten foot sections to prevent slippage. If the weather is particularly cold, you may find the underlayment refuses to stay put. In this case, use nails or staples to fix it down. Once the top has been stuck down, remove the bottom half of the backing and stick the rest of the underlayment down. Each course (or lap) of underlayment should overlap by two inches but most brands of underlayment will include a helpful marked guideline to assist with this. If you need to start a new roll mid-course, you should overlap the edges by four inches and hips and ridges should be overlapped by at least six inches.
It is really important to ensure that your underlayment is flat; uneven underlayment will cause noticeable warping when the tiles have been laid.
How far in from the edge your underlayment will have to go may vary depending on location, so check with Building Regulations.
How to Roof a House Part Five: The Felt Paper
Felt paper (also known as tar paper or builders’ paper) adds more water and fire protection. One thing amateur roofers need to know about felt paper is that it is prone to tearing which can be very hazardous when walking along the roof. If your roof is very steep or you expect to be working for a few days, it is wise to invest in the heavier 30 pound paper as it is less likely to tear and wrinkle than the 15 pound paper. Felt paper covers the entire roof.
To start with, unroll a short section and secure it to the deckingt with a dozen or more staples in the centre.This can then be used as a pivot point for aligning your sheet. Work with sections of around ten feet in length at a time, stapling at least every foot (you may need to use nails if the roof is steep or weather windy). In windy conditions, never hold large pieces of unsecured felt paper (i.e no more than 25 feet); this can catch the wind and cause you to lose your footing. Overlap the paper at the ridge from both sides for an extra watertight seal. Don’t put felt paper over any valleys yet as you will need to waterproof them first.
How to Roof a House Part Six: Waterproofing Valleys (Open system)
Underlayment is the first consideration when waterproofing the valleys. It is easiest with two people working together as you can hold the underlayment away from the roof, remove both sides of the backing and position carefully in place, making sure you really push the material into the crease of the valley. What you don’t want to do is to create a baggy area above the crease as this will be prone to tearing. As always, overlap each piece as you travel down the valley and cut off the excess. Allow the material to overhang the eaves (nailing it at the edges) but not to extend past the gutter. Next, line up the valley metal and nail it in place when you’re satisfied. Now you can continue to lay felt paper up to the underlayment, being careful not to cut the underlayment when trimming. As mentioned in the video, if you are using the open system, you will create a metal channel when laying the shingles. You should allow this to widen by around an eighth of an inch every foot down the run.
How to Roof a House Part Seven: Starter Shingles
Starter shingles fulfil an important role. They prevent water seeping straight through to the underlayment and, since they are only half the width of standard shingles, they prevent an unsightly lump on the edge of your roof. Overlap your starter shingles about three-quarters of an inch over your drip edge and secure with five nails about two to three inches back from the eaves. Starter shingles have an adhesive strip on one side; this should be uppermost as it will stick to the first full course of shingles and improve water resistance. For a professional touch, consider adding starter shingles along the gable edge making sure they extend half an inch past the drip edge and two to three inches over the eaves.
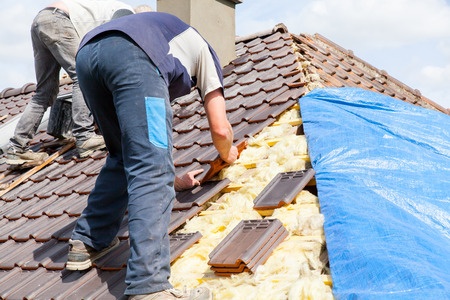
How to Roof a House Part Eight: Shingle Installation
Now your roof should be really starting to take shape. Take care with this part of the project since most problems with roofs come about through shoddy work at this stage. Secure your first row to the starter shingles according to the manufacturer’s recommended layout and nailing pattern. If there isn’t one (or you can’t find it), a general guide is to use around six zinc-coated nails which should be long enough to protrude at least three-quarters of an inch into the decking; nails should be driven in about an inch from either side and covered by an inch or more of the shingle above. Make sure nails are flush and use a pneumatic nailer where possible (with a hammer as back-up). Never use staples!
Once your first full row has been laid you will need to measure the reveal – that is the portion of tile exposed between rows – and set up lines every few rows to keep your shingles relatively level (a slight waviness isn’t a major issue). Work your way up both sides simultaneously towards the peak (going right to left if right-handed), using partial shingles (cut with the hook attachment on a Stanley knife). When within eight feet of the peak, measure the distance to the uppermost row of tiles and work out what the final reveals will be. If one side is a lot bigger than the other, snap lines to progressively bring down the difference (adjusting by no more than 3/16 of an inch per row). Overlap shingles at the ridge (as you did with the felt paper) and go long into the valleys and over hip ridges and rakes (the side by the gable end).
Once the shingles have all been laid, draw a line down the edge and trim the shingles along it using the hook.
How to Roof a House Part Nine: Dormer flashing
Although it is sometimes possible to reuse existing dormer flashing it is better practice to rip it all off and start again. That way you know there is no hidden corrosion or rot. Begin by laying underlayment so that it covers the bottom of the front dormer wall by about six inches. Do the same to the side walls, overlapping the front by about an inch. Next, lay shingles right up to the foot of the dormer before adding flashing to the front, nailing through both shingles and decking. You want to extend the base of the flashing a little way past the front of the dormer but cut the vertical portion flush. When you install the first piece of flashing beside the side dormer wall, cut into the join so you can bend the top portion around the corner, remembering to add sealant to the edge before you hammer it flat. Next you lay a row of shingles over this portion of flashing and then lay the next portion of flashing over those shingles and so on. Only nail the flashing to the dormer wall (and only on the end closest to the peak each time so you are covering the nails with each piece).
How to Roof a House Part Ten: Dealing with Stacks and Vents
Here is the standard method for dealing with stacks (or any other protrusions from your roof) and vents (or any other holes into your roof space). Vents don’t need underlayment but stacks do, so cut a two to three foot piece of underlayment per stack. You want your underlayment to fit snuggly around any stacks so cut a hole that is smaller than the stack, pushing the underlayment down over the stack and into place so that it overlaps the bottom of the stack. You can then just cut an over-sized hole in the felt paper as you roll it over, remembering to cut holes for the vents too. Caulk the pipes/stacks and then lay shingles half-way past each one. Nail flashing over that row of shingles – top and bottom – seal the nail holes and continue with the shingles, using the hook attachment on a stanley knife to cut them around the stack. To improve the look of your roof, spray any protrusions to match. You should also check that your roof has adequate ventilation as now is the time to saw some more holes in the decking if necessary.
How to Roof a House Part Eleven: Capping the Ridge
If you have a hipped roof, you will need to cap the hips first before the ridge. In both cases, draw chalk lines either side of the ridge but take them in a little so that your tiles will cover it. It doesn’t matter at what end you start capping but make sure that the prevailing winds flow over the shingles rather than against them (think stroking a cat!) You will usually need extra long nails to go through all the shingles below, particularly if you opt for the double thickness architectural caps. Put your nails in about an inch above the seam on either side. The top half of each end shingle can be torn off and a nail hammered in on either side to secure.
How to Roof a House Part Twelve: Finishing Off
Congratulations, you’re almost there. Sweep all the debris off the roof (following all the safety precautions above to protect anybody who might be below) and use a proper roofers’ sealant on any exposed nails (e.g. on the vent and stack flashing). A roof is exposed to all that nature can throw at it and many silicone or asphalt-based sealants just aren’t up to the job.
And there you have it, one way to roof a house. Watch this space as we will be seeing how theory meets practice by going out with a south west roofing company and taking some video footage.